
Kaye and Geoff's New House: Summary
Our current house is the third that we have designed and the second for which we were owner-builders. We have made numerous mistakes along the way but also learnt quite a bit about building, and what we like, in the process. Maybe we can help others considering the same path to avoid some of the errors we made, and to consider some of the ideas which turned out to be successful for us. But remember that these are just more-or-less "random" observations; they are not anything like a set of instructions for how to build a house or be an owner-builder. And in many cases they may only be relevant in our part of the world and with the building approach that we used.
We have no children so our house is specifically designed for just the two of us, with an allowance for visiting guests. As we approach (have reached?) old age our house needed to suppoort us if our mobility decreased in the future, and we also wanted it to include energy saving features where it was practical to do so.
Planning
We spent several years planning before we started to build, and our design evolved throughout the entire period. We not only worked on the design in this time, but also learnt about costs of materials and local planning and building rules; not just housing design requirements, but also things like bushire protection, builder's responsibilities towards neighbouring properties, health and safety, hours of work and anything else which we thought might be relevant. We also collected the names and contact details of recommended tradespeople and potential suppliers. Along the way we kept an eye out for useful second-hand materials, in particular saving lots of timber and other stuff from the house that we demolished. We also cut down some trees on the farm to give the timber time to dry out before its possible use in the new house.
Our house ended up costing more than we thought it might, and a lot more than we hoped. As an owner-builder, it can be very difficult to get an accurate estimate of what your house will cost, so you either need very careful budgeting or a very healthy contingency fund (double your estmate may not be too much).
 For example we often made assumptions which seemed reasonable, but were very wide of the mark. The electricity supply seemed like a simple process, but the local authority quoted hundreds of dollars to disconnect the old cottage, a similar amount to make a new connection to a builder's pole, more again to disconnect the builder's pole and yet more to make the connection to the new house. Each operation was expensive and charged separately. So rather than a temporary connection, at the start of the build we placed the meter box on the front boundary and when it ws practicable our electrician made the connection to the house in a conduit that we installed; as a result we saved hundreds of dollars, and had access to a couple of power points during the build and thereafter.
Most people designing their new house will be younger than us and have different needs, but for most people aspirations change and kids grow up, and everyone gets older, so you do need to design for the future rather than what you have been used to in the past.
The move from our 17 hectare rural property to a quarter acre in town was designed to give us better access to services and allow us to be less dependent on being able to drive a car. At the same time, we did our best to ensure that the new house would be suitable for us in the future. For example it is all on one level with no steps, doors are wide, the shower areas are spacious and without hobbs, and power points are accessable without bending over. Also we entirely avoided carpets which we have always found to be difficult to look after.
Organisation
As an owner-builders you will expect to do at least some of the hands-on building work yourself, even if it is only keeping the site clean and free from safety hazzards, but generally you will need to employ a number of specialist tradespeople, most notably electricians and plumbers whose work is controlled by government regulations. You will also need to deal with a wide range of suppliers to whom you may have to provide information on sizes and colours and delivery requirements. Computers, and specifically spreadsheets, allow you to keep track of these and other details, so it pays to be familiar with their use (and make sure that your files are backed up whenever you make changes).
We had spreadsheets for finances, tradespeople (name and contact details), suppliers (name, contact details, website address, prices, etc.), quotes, product comparisons, window and door schedules, lighting and electrical options and lots more. Many of these documents can be initiated and researched as part of the planning process, well before you actually start building and need the information that they contain. Assuming that you are employing tradespeople to do a lot of the work on your house (as we did) then this sort of organisation will be one of your primary tasks.
No matter how detailed your plans and specifications are, they will not include all the information needed to build a house. Much of this detail is effectively provided by "standard practice", the set of rules which you can expect tradespeople to follow (as a simple example, bricklayers do not normally need to be told how thick to make a mortar bed). This is generally OK unless you want something other than the standard approach; in this case you need to make your requirements very clear, before the work commences. However, inevitably tradespeople will be faced with situations where they are not sure how to proceed; in these cases you want them to consult you rather than make whatever decision they think might be right (or easiest). We were on site most of the time when tradespeople were working, and as a result we managed to resolve a few problems before they turned into serious and costly ones, or we ended up with something which we did not want.
We found that it was really important to be able to discuss our requirements with our tradespeople and get them to suggest options and explain the advantages and disadvanteges, and cost, of various approaches. Not all tradespeople are interested in doing this, or good at it, but many of our tradies lived locally and were our friends before they worked on our house, and most of the rest were chosen because they were known to and recommended by friends. For us this worked very well; there were no disputes, and we felt that we were in control of the process most of the time, which is about as good as you can hope for. This minimised the stress which seems to be an inevitable part of being an owner-builder.
It was also very helpful if, as part of the job, our tradespeople measured up and ordered the materials required. They either sent us the invoice and we paid it, or we reimbursed them. This decreased the chances of mistakes being made with the amount or type of materials being purchased and meant that deliveries were better coordinated, but in addition often decreased the price we paid because tradespeople have trade accounts which typically come with a 10% discount. As it happened we were also able to open an account ourselves at the local hardware store which generally gave us a 10% discount on most materials, including tools, hardware and fittings.
Design
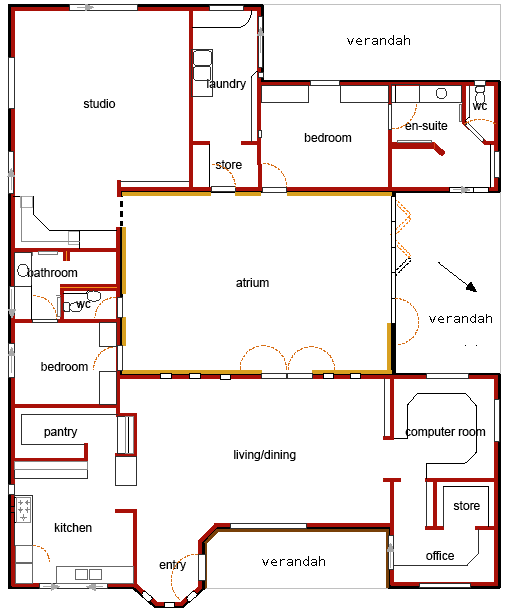
Our house is single-story with a basic plan as shown below. The total area including verandahs but excluding the carport is about 350 square metres. You will see that the two largest rooms are the atrium and the studio, neither of which would even exist in most modern Australian house design. But they reflect our lifestyle - the studio has turned out to be Kaye's favourite room and she spends a lot of time there. The atrium (jokingly refered to as our over-size corridoor) is filled with plants and has an expansive view of the patio garden - some compensation for having to move from the wide open spaces of the farm.
Before retiring we were both computer programers, and this turned out to be a very useful skill when it came to designing and building our house. While most people are familiar with spreadsheet programs and probably have one their computer, drawing packages are less common, but they are what you need to help you design your dream house. You could use pencil and paper, but a drawing program will give you much more flexibility, allowing you to easily make changes, determine dimensions, colour-code different parts of your plan, make versions, print copies at different scales and much more. We used our drawing package for everything from plans and elevations to lighting design and garden layout.
If you do look to buy a drawing program then expect to pay roughly $100 for one - possibly the most rewarding $100 you will spend throughout the entire building process. Teach yourself how to use its basic features before you start actually working on your design. Important requirements are support for layers and the ability to save files in standard formats (like PDF) in addition to the program's native format. Note that Photoshop and similar "painting" or photo manipulation programs are not suitable for this task; you need a drawing package which allows you to create and manipulate graphic objects.
Eaves and solar design
 We are real fans of eaves, a feature of house design which in recent years has become less common, possibly because with smaller block sizes and larger houses there is just not enough space for them inside the boundary line. Also they are not as useful on two story houses. We like the fact that we can walk around the house when it is raining and not get wet, but their big advantage is that, if correctly designed, they contribute to the passive heating and cooling of the house.
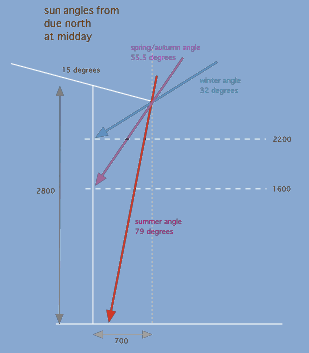
To get the design right, we drew a diagram (with the ever-useful drawing package) of the sun angles at our latitude and with the slope of our roof (see graphic, right). It shows that at midday in the middle of summer, with 700 millimetre eaves, the sun will not hit the walls of the house at all. In spring and autumn it will be 1600 millimetres up the wall, and in mid-winter it will extend up to 2200 millimetres.
So windows on the north side of the house will be entirely shaded at the hottest time of the day in summer, while they will get full sun during the winter, the optimum arrangement for passive heating/cooling.
As a compromise between cost and thermal efficiency, we had just our large living room north-east facing window double glazed, with the added benefit of reducing noise from the road and school outside.
We also like verandahs, and our house has three of them, giving protection from the rain when going in or out the external doors, and providing useful areas protected from the sun and rain when working or relaxing outside. If you have timber window frames or timber doors, eaves and verandahs can minimise the deleterious effects of rain and sun. Our back verandah has a fold down clothes line as an alternative to the rotary hoist in wet weather, and of course the verandahs can serve as a temporary storage space for bulky garden items or work space out of the rain.
Our house has all three external doors opening onto verandahs, which allows us to step outside when it is raining without getting wet, and to be under cover when we arrive home and are searching for the key to unlock the door.
Energy rating
In Australia all new houses are required to have an energy rating to encourage more energy efficient design. This is done by feeding design data taken from your plans and a questionaire into a computer program which then provides a number which is meant to indicate how energy efficient the house will be; the higher the number the better, with anything above six considered good, and ten being exceptional. You pay a company to do this for you.
In practice the rating system is a bit strange. Our experience with the process left us wondering how well it measured energy eficiency of more unusual designs like reverse brick veneer and what the companies providing the rating knew about the subject. For example the company we used gave us a rating based on insulation requirements different from what our design specified, without any consultation with us. From what I have read on the subject and based on experience with a steel-framed shed on the farm, I think it likely that our design was more efficient, but have no way of knowing for sure.
The stated aim of the rating system is that all new houses will have a rating of six or above. But ours did not achieve this, and I suspect most project homes do not either. So how were we allowed to build? It seems that if you do not reach the standard (we did come quite close), you can be "deemed to comply" and that means that you can go ahead and build using your plan and specs without modification.
As you can see, we had a lot of trouble making sense of the energy rating system.
Kitchen
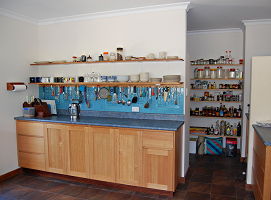
People's ideas on what constitutes a good kitchen design vary a lot, which is reasonable because this is an area where everyone has different requirements; but for us it is a work area rather than a space for socialising and so our design has some similarites with a commercial kitchen. We have a double sink seamlessly built in to a stainless steel benchtop, and a stainless steel benchtop for the gas cooktop. All our commonly-used plates, crockery and cooking implements are on display on shelves and hooks above the main working benchtop and so are very easy to get at and put away.
We generally try to store things near where they will be used (we try to be more organised than most people to compensate for the fact that we are more lazy than most people). The dividing bench between the kitchen and the living room has large drawers where we keep clean tablecloths, place mats and teatowels so that they are easy to get to.
Rubbish bins can be difficult to find a home for in a kitchen, but we found a suitable off-the-shelf solution which we had built in to the under-bench cupboards (in fact the right-end cabinet in the picture). It consists of a frame supporting two roll-out 30 litre bins - one for general rubbish and one for recycling. These units are available with a choice of plastic or metal bins and offer a range of bin size configurations.

We do not have any overhead cupboards, since they are generally difficult to reach, and the contents tend to end up being stacked several layers high and deep. It is a bit of an indulgence, but we have a pantry which is effectively a separate room off the kitchen, lined with shelves of different widths to accommodate variously sized containers. The pantry stores the items that would otherwise be placed in overhead cupboards, but means that they are much easier to find and get hold of.
After having an under-bench oven in our previous house, to protect our backs and knees we determined that we would have one at bench height in this house. To make it easier to use, we also wanted a side-opening door. For some reason this arrangement is not common, and so the choice available was quite limited, especially if very expensive imported ovens were excluded. But now that we have a side-opening door oven, we are at a loss to understand why all ovens do not operate that way (as it seems all microwave ovens do). The door mechansism is much simpler and getting things in and out of the oven is a lot easier, as is access for cleaning.
Our gas cooktop is built in to a custom-made stainless steel counter top which abuts the oven. This gives us a suitable area to place baking trays and other hot items when they are removed from the oven or the cooktop.
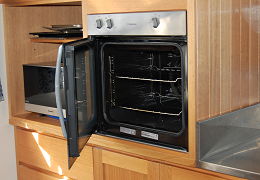
The first microwave oven we ever bought (a Panasonic Genius) lasted for nealy 45 years; in fact it finally gave up working a few months after we moved in to our new house. There is little doubt that one bought today would not match this impressively long life, and we have seen a couple owned by relatives rust away or stop working after five to ten years. So we took the conservative approach and did not have our new microwave built in; it just sits in an oversize space next to the regular oven. Besides allowing it to be easily replaced, this has the added advantage that the top of the microwave is available to put things on as they are removed from the oven. It also turned out that there was room for a wide shelf above the microwave, a good place to store wire cake racks and oven trays.
Computers and cables
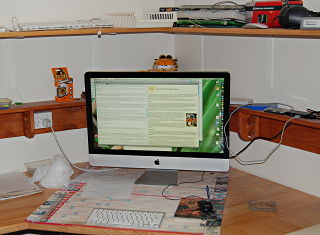 Being ex-computer programmers and reluctant to discard working machines, we have lots of computers. Also, we favour desk-top machines with large screens, and there is also the need for external disks, routers, printers, scanners and books and manuals.
So we designed a room dedicated to computer use. While this may be considered excessive by many people, most households have at least a bench or table with a computer and a printer, and how to deal with the proliferation of cables is always an issue. Wifi has helped, but we still have quite a few plug packs, power cords and network cables to contend with.
Our solution was to have a narrow shelf above the (built-in) desks and a wide shelf above that, going all around three walls. The top shelf holds books, spare keyboards, unused equipment and so on. The lower shelf has holes at regular intervals which are wide enough to admit a standard mains power plug, and the shelf is braced with timber brackets containing two holes. One of these is large enough to pass a power plug and the smaller one allows most computer-type connectors to be put through. A total of eight double power points (barely enough as it has turned out) are set in to the backing board under the shelf. This permits us to route most of the cables along under the shelf; not very "elegant" but it gets them off the top of the desk. Small devices such as routers, hubs and backup disks can sit on the lower shelf with their cables fed through the included openings.
Building
Printed plans
We seemed to need a lot more copies of the plans than we expected, and found that they did not last long on the building site if they were not in plastic covers. Quite a few local businesses (for example Officeworks) offered large-format printing from PDF files, and plastic lamination of the printed plans.
Shed
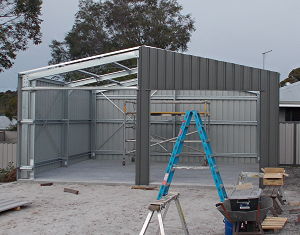 We knew that access to the rear of our block would be more difficult once serious building got under way, and we wanted somewhere to store tools and materials and to provide shelter from the weather while the build was progressing. So our first task was to erect a six metre square shed at the rear of the property. The concreters put down the slab and we looked for the cheapest kit that we could find. Once it was delivered we assembled our "build team" - a friend who renovated old houses, his brother-in-law (a temporaily unemployed professional engineer), his son (the muscle) and a friend who was a specialist metalworker. You could not imagine a more suitable group of people for the task.
However, once we got started it was obvious that the cheapest kit meant the most expensive erection process. The instructions were less than adequate, with the text and pictures failing to agree in many cases. Without the engineer, who zeroed in on the pictures and mostly ignored the text, it is debatable if we would have succeeded in putting it all together. In the end it was put up correctly but took a week - the labour costs for that time came to several times the cost of the kit.
As it happened, we already had experience with shed building on our rural property, and it was totally different. We ordered a custom-designed shed from the local metal supply company and they delivered it as pre-assembled braced frames which could just be tek-screwed together. It fact it was the same company and system which we used to build the house. This would have been more expensive up-front, but almost certainly would have been a lot cheaper overall, since the two of us could have put it together on our own. We know this because that is what we did on the farm. The only thing we might have needed help with was the installation of the roller doors - the final assembly task.
The shed we have ended up with seems to be structurally sound so our only real complaint with the supplier is the poor instructions. But to keep the cost of the materials as low as possible the design of the shed involved lots of different strengthening and joining pieces rather than monolithic sections, and these were mostly what took time to sort out and get in place.
Once we were living in the house we wanted the shed to be a workshop, and again from previous experience we knew that light levels could be an issue. The shed has no windows but it does have clear plastic panels in the roof, two on each side. This is more than is generally used, but is certainly not too many, especially as over time dirt and deterioration of the panels may reduce their transparency.
Treated pine
Our living/dining area has exposed timber beams, which break up what would otherwise be a large area of plain white ceiling. We would have liked to use local jarrah or karri hardwood for the beams, but this sort of timber is rapidly becoming very expensive and only available in shorter lengths, as all the larger trees in native forests have been taken out. So unless we used glue laminated or similar "manufactured" timber, we had little choice other than treated pine. The fact that it is treated did not concern us too much, since it is not where people would normally come into contact with it, and apparently in modern times the process no longer involves using arsenic.
But our lack of understanding of the available grades of treated pine did cause a potential problem. There is a rating system; H1 indicates minimal treatment while H6 is the most resistant to extreme environmental conditions. H2 is designed to repell termites and other insects, but is suseptible to rotting, so is specified for indoor use. H3 is weather and insect resistant and is recommended for outdoor above-ground use. H4 is similar but is used for posts which are put into the ground.
Because our exposed beams were indoors, and we did not know then what we know now, our builders used H2 rated pine. But the problem with this is that H2 treated pine is covered in a sort of powdery green paint, presumably to make it easy to to identify. Despite what you might assume, this is not the copper coming out onto the surface of the timber. Since this pine is expected to be used for framing which will always be covered, the green coating is not generally considered to be a problem. H3 treated pine, which is expected to be on display, does not have a similar coating.
We wanted our exposed beams to have a natural timber look so we should have specified H3 grade and thereby avoid the green surface colour. But luckily we found a satisfactory solution by using a jarrah-look timber stain, which was surprisingly effective in covering up the green. We liked it so much we also stained the non-greened external treated timbers with the same product.
Ceiling space

The ceiling space is an area of the house which is generally not given much considertion, but if you have ever had to get up into it you will know that this can be a very uncomfortable and risky exercise. As soon as the roofing was completed, well before the ceiling plaster was installed, we set up walkways, or rather crawlways, in the ceiling, starting from the manholes and extending for as far as it was relatively easy to clamber under the rafters. The crawlways consisted of 19 millimetre particle board about half a metre wide, screwed to the top of the ceiling joists. The local hardware shop had some particle boards with damaged edges and sold them to us for a fraction of their new cost.
The crawlways have turned out to be very useful, both for tradespeople installing cables, pipes and fittings, but also for us placing insulation batts, and accessing the ceiling space after the house was finished. For example, we had a splitter for the TV signal installed in the ceiling space, and it subsequently needed attention - this was much easier when we did not have to balance on the rafters. The smoke alarms in the atrium are very high up on the wall, so we set them up so that they could be accessed from the back (ie. from the crawlways in the ceiling space).
We also asked the electrician to put a power point in the ceiling space close to each manhole. This gave us power for the splitter, but also for a light on an extension cord which makes working in the space a lot easier. We have two manholes because there are two unconnected ceiling spaces (separated by the atrium and the living room).
Bathrooms and toilets
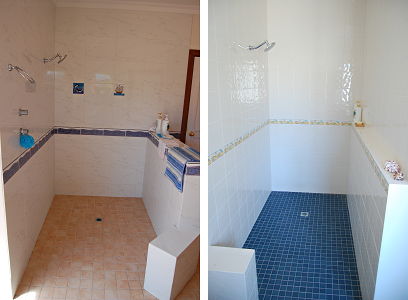 In both bathrooms we have "open" showers, (in Britain called a "wet room"), that is without a shower enclosure or hob. If you plan something similar, make sure that you get the tiler to provide enough slope on the floor to the drain, at least double what they are used to providing in a shower cubicle, and make sure that the slope extends out to the surrounding walls and at least a metre from the floor drain where there is no immediate wall. To achieve this the concrete slab in the wet areas ideally needs a 25 millimetres or so set down (but this should not be allowed to compromise the slab thickness).
Despite the extra fall allowed on the floor, water in an open shower will splash around and the shower area will probably take longer to dry out than in an enclosure. Our ensuite has a sliding door opening to the outside under a verandah, and so can be left open for most of the day in any weather to encourage air movement through the room. Privacy is maintained by our encosed courtyard.
Note that the wall ending in an angle enclosing the shower in our en-suite (see plan above and left hand picture) is only 1050 millimetres high, which prevents the shower area feeling too enclosed and provides somewhere to put soap and shampoo. The angled bit is just 450 millimetres high, helpful to dry the toes when we are feeling arthritic (if you are yet to get creaking joints then it could hold a pot plant). The guest bathroom has a similar short wall at the start of the shower area (right hand picture).
We had our towel rails made by our cabinet-maker, using silky oak milled from trees on our farm. Previous experience had taught us that towel rails in prolonged contact with wet material in the bathroom or kitchen, and finished with the polish normally used on furniture, can develop mould growth, so we coated them with marine varnish.
Windows and doors
The internal door frames and doors for our house were custom built, but twenty years ago when we built our house on the farm we used jarrah frames and panel doors which we bought. This is certainly cheaper, but we found a strange anomoly in the sizes. Standard frames are 2143 high, which fits in with standard brick coursing (although we have seen several other sizes for sale), but standard doors are 2040 high. There needs to be a few millimetres clearance between the door and the frame on all sides, but that does not come close to making up the discrepancy. While it is reasonably easy to attach a piece of timber to the inside of the frame to fill the gap, we have never understood why the frames (or the doors) are not made to match. It is something to look out for.

We found that door and window sizes are also a possible source of problems when you are documenting your requirements. The plans should show the size of each opening and the elevations will display the height from a specified level. But you may have a separate spreadsheet, or schedule drawn on the plans, showing not just the size of the windows but also the type, colour, number of panels and so on. However this specification would normally have the actual window size rather than the frame size. Since, as with doors, there needs to be several millimetres clearance around the window, you will need to be sure that whoever is responsible for supplying the frames and windows understands exactly what the specified dimensions refer to.
The windows which at the end of the build received "stained glass" (in fact a combination of fused glass and copper foiling) were initially constructed and installed in exactly the same way as all the other aluminium-framed windows, so they were always weather and insect proof. The stained glass panels were installed behind the clear glass, separated by a foam strip around the edge. This is important to allow for expansion and contraction of the glass. The panels were held in place by timber beading (also with an edge foam strip) screwed sideways into the aluminium frame, which was over 50 millimetres wide and so more than wide enough for this to work.
Lighting
 For several years there has been a fashion for downlights in the ceiling, especially in kitchens and other work areas. While this arrangement might look neat, in our experience the quality of lighting which results is far from ideal, even if a considerable number are installed. A friend's very small kitchen has about six of them, which even with LED globes adds up to quite a bit of power use, and even then the light is uneven and not particularly bright. Because older globes which produce a lot of heat could be used in these fittings, it has been common practice to keep ceiling insulation batts well clear of downlights. This can compromise the insulating effect of the batts to a greater degree than the relatively small area of the open space would suggest.
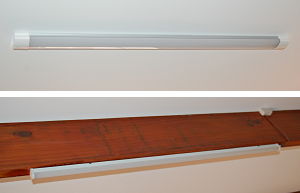
In our quite large kitchen we put in two 36 watt LED lights which look like a neater lower-profile version of the old 1200 millimetre long fluorescent fittings (top picture), and together they provide brilliant, even illumination for the whole room. I do not think that there is any significant metal in their construction so they will not rust and there is no paint to peel. In addition we do have one downlight directly over the sink (the only downlight in the house) and strip lighting over the work benches, where the shelves above the bench and our bodies when working there would otherwise tend to create shadows from the ceiling lights.
Our approach to the over-bench LED strip lighting was quite complex. We bought a driver (a box which combines a 240 to 12 volt transformer with additional circuitry designed to provide the correct electrical conditions for LEDs) and a LED strip plus an aluminium channel to put it in; we had the elecrician put in a low voltage wire and a power point at the back inside a kitchen cabinet for the driver; and we got the cabinetmaker to install the channel in a groove on the underside of the shelf above the bench. Amazingly, in the end it all worked.
But there is a better way! Later in the building process, we had to choose lights for our large living room, which has exposed timber beams 250 millimetres deep but only 45 millimetres wide. We found LED strip lights which came in several lengths (which could be plugged together to make even longer lengths) and since they were only about 35 millimetres wide, they fitted neatly along the bottom of the beams (bottom picture). Also, they were 240 volt fittings so no driver was required. We purchased four metre-long lights and a couple of half-metres and installed them as four strips on alternate beams. We were very unsure of how they would go in lighting such a large room with a high ceiling, but they have turned out very well. They are switched separately, and it turns out that just one meter-long fitting is enought to light the room normally; we turn another one on when eating or reading at the table. So far we have not had the need to turn them all on at once.

The large studio, where Kaye spins, weaves and sews, has six of the same 1200 millimetre "like the old fluorescent" LED lights as the kitchen, switched in pairs. They provide fantastic even illumination and allow her to happily work in the studio at night, even though her eyesight is less than perfect. The computer room and office each have just one of these same fittings, and we have also used them in the shed and the back verandah (they are rated to resist light splashing with water).
In rooms which need less light, such as bathrooms and bedrooms where downlights are also often used, we used a single spot, on the wall at around two metres high and pointed at the ceiling. This arrangement provides surprisingly bright but diffuse illumination, the fittings are very cheap to buy and install and they are easily accessible when the globes need to be changed. We used this approach in our previous house and 25 years on the lights there are still in as-new condition, unlike some of the downlights whose trim has rusted quite badly. If you use the "spot on the wall" approach, just make sure that the fitting is out of the way of any nearby doors when they are opened towards the wall.
Underfloor (in-screed) heating
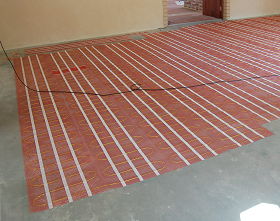
Originally, we planned to have engineered timber flooring where we wanted underfloor heating, but the technical difficulties were just too much for us - each component had a different supplier, it only worked with some floors and local tradesmen had no experience installing it. Also, some suppliers went out of business while we were trying to sort it out, so after a long delay, we decided to go with ceramic tiles on the floor in the living room and computer rooms, which allowed us to use under-tile (in-screed) heating.
We purchased a kit on-line from a firm called Coldbuster and it worked out well. The kit supplied everything required and came with comprehensive and well-written instructions. For the living room we needed two sets of cables (luckily as it turned out; see below) which if required could theoretically be connected to one switch/thermostat. Except that the electrician had not allowed for the amperage involved, and only installed 16 amp. cable, which was not quite enough (we needed 18). So we purchased a second switch/thermostat and managed to find a place to put it which did not involve having to chase the cable up the already finished wall. The lesson obviously is to make sure that your electrician is aware of your requirements if you plan to have any unusual or heavy use equipment.
In fact, it turned out very well in the end. We put down the heating cable and the tiler was happy to just use a slightly thicker screed. In retrospect we think that the tiles are cheaper and better than timber; they soak up heat whenever they get sun on them through the windows and we do not find them too hard. They are cool in summer and in winter we normally wear sheepskin boots inside anyway. Even the separate circuits turned out to be useful - we often just turn on one in the afternoon (and turn it off in the evening) to directly heat only the area where we spend most time.
We do not have any idea how energy efficient this form of heating is, in particular what losses there are through the bottom and sides of the cement slab. We have no insulation between the heating elements and the slab, or the slab and the ground. I am sure if we did it would improve the performance of the system, but we have no way of determining by how much. It is certainly easier to use and safer than open fires and electric radiators, especially as we get older.
Electrical
Unless a power point is relatively inaccessable and has a single defined function, there seems to be no point in not making them all doubles. The marginal cost is only a few dollars but the convenience over the life of the building is significant. In general they should be located in "exposed" places like the walls of corridors where you will not have furniture, not in corners. Think carefully about the height of the power points where you plan to have built-in furniture to avoid having to move them when the cabinetry is installed.
One place where we found that carefully located multiple power points were very useful was near the head of our bed. Each side of the bed, for example, may require a socket for a reading lamp, a clock, an electric blanket and even an adjustable bed base, most of which you will want to operate while lying in bed.
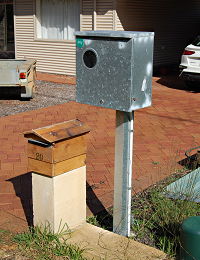
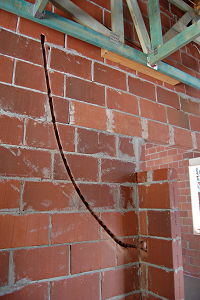
On internal brick walls the standard practice is to run electrical cables (and plumbing pipes) in conduit "chased" into the brickwork. The wall is then plastered over, which hides the location of these cables. Generally, you can expect the electrician to take a cable vertically from a power point or switch up to the roof space, but this is not always the case. Sometimes he (or she) may go off-line a bit, or, as in the picture on the right, take a non-linear path, in this case to avoid cutting in to the end of a reinforced brick lintol which spanned the opening to our computer room.
 When cabinets, shelving, picture hooks or whatever have to be screwed to the plastered wall, there is a danger of the drill bit hitting the cables. So it can be very useful to take pictures of any walls which hold cables or pipes before the plastering commences.
We did this, but failed to show them to the person installing our kitchen cabinets. He drilled into a live wire but luckily was protected by the residual current device in the fuse box. The electrician could not just rejoin the wire in-situ; so our solution was to cut out a space so that a power point could be installed, which then just needed a bit of plaster and a small paint job to make it good.
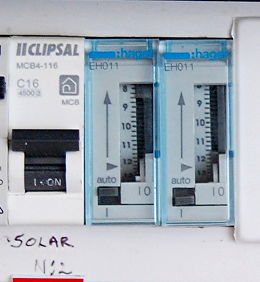
The underfloor heating in the bathrooms would be relatively ineffective if we turned it on just when we wanted to have a shower in the morning, so it is controlled by a timer which is set to come on an hour or so before we normally get out of bed. We found that the easiest way to do this was with a timer in the fuse box, and it turns out that these devices are relatively modestly priced given their complexity. Of course using them means that the floor heating needs to have its own circuit; but this would normally be the case anyway.
Both of our bathrooms have exhaust fans with timer switches, so that we can leave them going for around 20 minutes after we have a shower. We chose the cheapest (but still rather expensive) switches on the market which work with a spring-loaded button. Almost immediately after installation the one in the en-suite started to "stick", and no amount of adjustment would make it work reliably. So we replaced it with a fully-electronic switch which was only about $30 more expensive and so far this one has worked perfectly.
We have referred above to the need to make sure that your electrical cables have the rating required for the use planned for them.
Painting
The paint on the ceilings of the wet areas of our first house peeled in patches over time, which was very unsightly. Before we sold it we got a painter in and under the circustances he did a reasonable repair job, but the edges of the peeled sections were still visible if you knew to look. We asked him why it happened, and he said that the plaster should have been given a sealing coat before the top coat was applied.
After this experience, we have always insisted that wet area ceilings are to be sealed. We have been told that the problem only occurs with some types of plasterboard, and that may be correct, but it probably costs only marginally more to use a sealer-undercoat, and it makes us feel that we have done all we can to avoid a possible future problem.
Plumbing and other penetrations
Assuming that you have a concrete slab, the positions of the drainage pipes (from basins and sinks, baths and showers, toilets and floor wastes) must be determined and pipes put in place by the plumber before the concrete is poured, so they have to be marked on the plans. It might seem strange to be worrying about exactly where your kitchen sink and shower waste will be before building even starts, but that is how it is.
Walls, and ceilings and roofs, will probably have pipes of one sort or another going through them for things such as exhaust fans and range hoods. Their positions also need to be considered at an early stage in the build and their locations marked on the plans. This can be done by marking a hatched area which is to be left free of framing timbers, roof trusses or rafters as appropriate. We learned this lesson the hard way on our previous house when we found late in the build that the rangehood exhaust entered the ceiling directly under a stringer - a stiffening timber which absolutely could not be cut. The solution was to get a purpose-built sheet steel "box" which just fitted the space available under the stringer to allow a 90° change in direction of the exhaust pipe.
Roofing and gutters
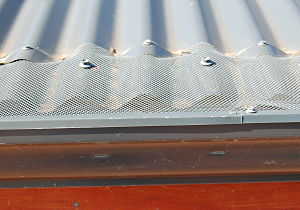 In the past our experience of cleaning out gutters has involved getting up on ladders and losing large amounts of blood thanks to the sharp edges of the roofing iron, so for this house we looked for something better in the way of gutter design. We probably found it, manufactured in Queensland and according to some web sites, available in Western Australia. But that turned out not to be true, and shipping it across the country was theoretically possible, but not practical due to the fact that the transport companies would take no responsibility for any damage and affordable insurance was not available. In any case, half way through our build, manufacturing of the guttering was discontinued after the company which supplied it was taken over.
So despite our misgivings, to exclude sticks and leaves, we used a steel mesh product which was tek-screwed down over the gutter. As we feared, this quite expensive (it doubled the cost of the guttering) approach has its problems. While it keeps out leaves and twigs, it is no barrier to seeds, dirt and dust, which even in very limited amounts will support a small forest of weeds growing wherever the water persists for a while. Then the mesh makes the cleaning even more difficult, as we do not want to just squirt through with a hose since this could wash the weeds into our water tank, and may block the downpipes. It turns out that the best approach is to remove the tek screws and metal strip on the front of the gutter (leaving the ones at the back) which allows you to get your hand in to clean out the gunk.
There is one feature of our gutters which did work out as designed. We ordered them with slots cut in the outside wall, about two-thirds of the way up. If the gutter develops any sort of a blockage or is just overwhelmed in a downpour, the water goes out these slots rather than flowing over the back of the gutter. While for us this would not be a disaster, it could be a serious problem on buildings without eaves as the water may find its way into the building wall cavity.
Disposing of the stormwater from the gutters is a problem for us in winter, when the ground becomes fully saturated rendering soakwells totally useless, so although we installed soakwells, we made sure that they could overflow into pipes which ultimately send the water on to the road at the front of the house. However, over summer we often need water for the garden or the fish pond and using scheme water seems very wasteful, especially if there is a bit of rain around. So we put diverters, purchased quite cheaply from Bunnings, on three of the downpipes, and on occassions they have been used to fill and top up the pond. As it happens, they also turned out to be useful for moving water in the opposite direction, when rainfall overfilled the pond and we needed to pump water out of it - we just attached the pump outlet to the diverter so that the water ran out through our stormwater pipes to the soakwell.
Fish pond
Our fish pond is constructed with double-brick walls, the cavity filled with concrete, on a reinforced concrete base. It is vaguely three metres by one and a half metres, and about half a metre deep. This depth is suitable for water lillies and other aquatic plants in containers, although depending on the plant, some pots may need to be raised using a few bricks or something silmilar. We call it a fish pond, but we particularly want it to attract and provide a breeding place for frogs and dragonflies. It has no artificial aeration and has developed a layer of mushy rotting vegetation on the bottom which we are happy to leave there for insects and frogs to hide in. On the farm our pond had a drain in the base, but the house in town, with level ground, provides no easy way to passively drain the water, so if required we use a pump (see above).

Where we live in the south-west of Western Australia, there are only two amphibian species which are likely to breed in a pond such as ours. These are the motorbike frog (Litoria moorei) and the slender tree frog (Littoria adelaidensis), which require a relatively large volume of still permanent water, since their jelly-encased eggs are laid in water often attached to vegetation and their tadpole stage typically lasts around six months over spring and summer. Other frogs native to the region develop much faster as they breed in small temporary ponds, usually immediately after rain (most of the small Crinea species), or in burrows in moist soil (the moaning frog and other Heleioporus species), and some develop from egg to adult without ever being in water.
The adults of most species will probably like a moist protected area to spend time in, particularly if it has vegetation which attracts insects for them to eat. But the motorbike and slender tree frogs will happily spend hours in the midday sun in summer on the side of the pond or adjacent vegetation, as long as the water is readily available for a quick "dip" to rehydrate and possibly escape predators. Do not feel the need to provide a log or something similar for them to get in and out of the water - these frogs can get anywhere they like without any help, and often do.
Motorbike frogs are relatively common, even in built-up areas such as the suburbs of Perth. So if you make a suitable pond, they will probably find it on their own. You should never collect tadpoles or adult frogs from other areas in case you aid the spread of the chytrid fungus which in recent years has decimated (and possibly wiped out some) frog species in Western Australia and around the world.
Finally, if you want fish and frogs in your pond, you need to make sure that they are compatable. Our (very limited) experience suggests that rosy barbs and golden barbs, exotics which are in the aquarium trade, and possibly the native pygmy perch, are OK; mosquito fish (Gambusia affinis) may be a risk to small tadpoles, and we are not sure about goldfish.