 House
House
House
House

Soon after we moved from the city to our rural property, we pulled down the existing timber-framed house and built a new one to replace it. We designed and sub-contracted the construction ourselves, completing it early in 2002. When we decided to move in to town, to a block we already owned, we repeated the process, demolishing the cottage on the block and owner-building a new house.
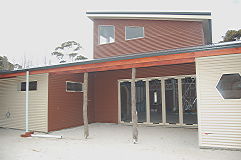
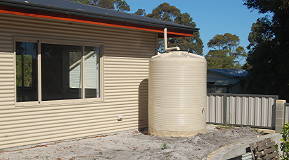
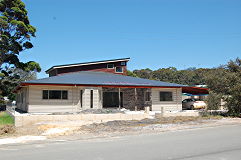
The slope of the land and the orientation of the block made for a few challenges in combining our desire for a solar-passive building with the practicalities of designing a house which would serve our needs, especially as we got older. The resulting house faces north east and is reverse brick veneer, with a concrete pad, steel frame and Colorbond steel cladding and roof. The 700 millimetre eaves shade the walls and windows in summer but allow the sun in during the winter. The house is one story with no internal changes of level and the outside areas are basically flat. The walls and ceiling are packed with insulation, the hot water system is solar and we have eleven solar panels on the roof.
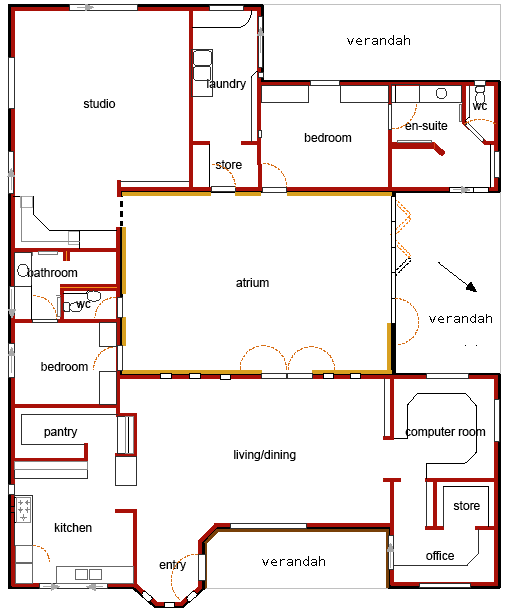
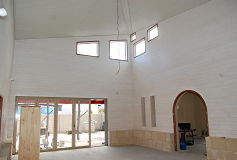
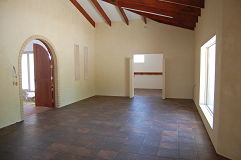
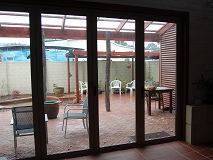
The huge central atrium opens via stacker doors to a north west facing courtyard. There are two bedrooms each with en-suite, a kitchen, living/dining room, computer room/office, laundry and large studio. Almost all the doors are wide enough to allow for a wheelchair and the showers are spacious with no enclosure or hob. Installed heating is under-floor, limited to the bathrooms and the living room, controlled by thermostats and timers. There is no active cooling.
The back yard has a six metre square workshop and a shadehouse and garden shed. The courtyard has a simple pergola supporting grape vines which shade the area in summer but lose their leaves to let the sun in during winter.
This page is a history of the building process with lots of illustrations to show what the house looked like along the way. You can click on the right hand side pictures to enlarge them. Check out the summary page if you want a bit more technical detail; especially if you are considering designing and/or building a house of your own.
The house plan looks like this:
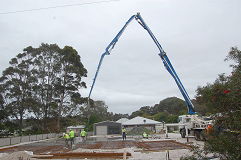
It took a long time but in January 2018 we actually started constructing our new house, with only a few minor changes to the plan shown above. However in the time it took to get to this stage, we had not been idle.
 |
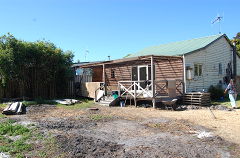
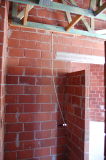
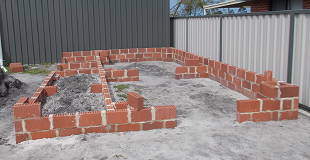
While wall and fence building was proceeding, we demolished the old wooden cottage which was on the site. It was in even worse condition than we suspected, with an abandoned bee hive in one wall, very rotted timber stumps, and stringers in the roof with huge splits. The slightly dangerous job of removing the roof and the roofing timbers was completed without significant injury, and many of the materials were recycled, mostly given to friends who incorporated them into other buildings. We saved the jarrah floor boards and some other stuff for ourselves, hoping that most of it would find a home in the new house. The back verandah was lined with asbestos and this needed to be removed by a company which specialised in this work.
 |
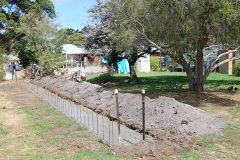
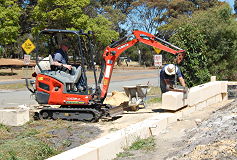
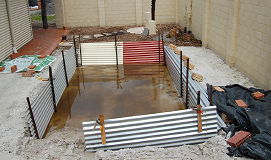
Once the cottage plus at least six electrical earths, a variety of used and unused drainage pipes, buried granite pavers and the stump of a large palm were removed, a lot of soil was excavated and new fill added and compacted ready for the concrete footings and slab. We managed to keep a pile of topsoil in the back yard to be used in garden beds when the house building was completed.
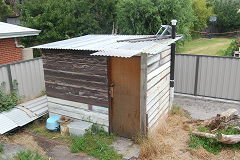 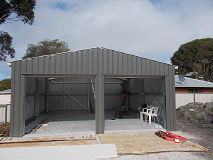 |
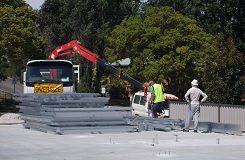
Since access to the rear of the block would be restricted once the actual house building got under way, and because having a lock-up shed would be useful during this process, and afterwards, we purchased a kit for a six by six metre shed and erected it against the back fence. The instructions that came with it were very poor and it was only due to the fact that we had a qualified engineer on the "build team" that it ended up being erected properly. Ultimately it was to be Geoff's workshop, but in the mean time it turned out to be very useful for securely storing tools and materials and providing a place to shelter from the sun and the rain.
  |
  |
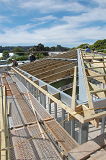 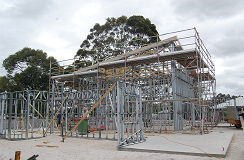 |
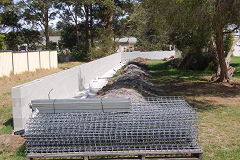
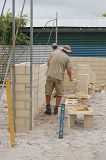
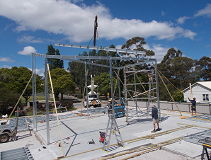
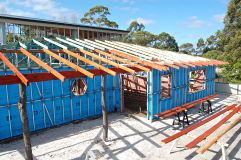
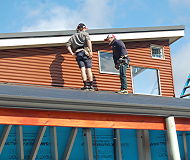
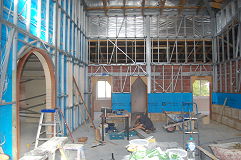
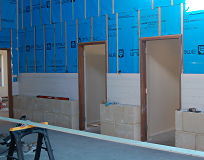
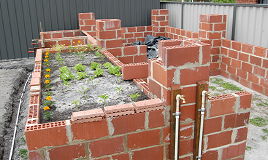
Erecting the perimeter prefabricated steel wall panels turned out to be fast and relatively easy. Several panels were put aside, to be erected after the bricks had been delivered to the site and placed on the slab. The steel frame was finally completed half way through February.
The steel erection took all our concentration and lots of our time, so we welcomed a small hiatus in building activity before the bricklaying got underway. This allowed us to work on organising the bricks, steel and masonry lintels, brick ties, reflective insulation, dampcourse, door frames, internal window frames, an electrical sub-box, a cat door frame and all the other stuff which had to be available for the bricklayers.
   |
 |
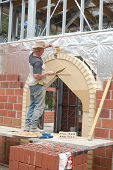
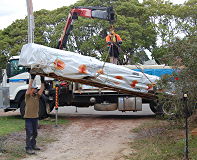
After a few false starts and with help from our neighbours, we sourced the verandah posts from a farmer 150 kilometres away in Gnowangerup, who cut them the day before we went to collect them. They are jam trees, a variety of Acacia often used for fence posts due to their natural resistance to termites and rotting. The timber is very hard and heavy, and installing the posts involved quite a bit of muscle. We were told that the bark will come off in a year or two but the timber underneath will still look good.
  |
  |
  |
At the same time the electrician returned to complete the first phase of the electrical installation. We asked if we could get power to the shed at the back, and within a day it was done, including LED lights and three double power points. This saved us from running a very long extension lead to the rear of the block when we needed power behind the house.
  |
 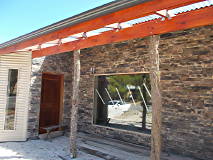 |
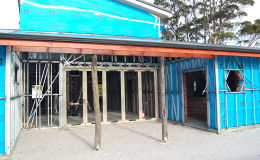
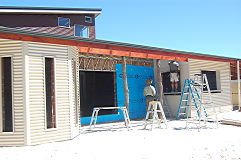
The weather improved considerably as the steel cladding was finally completed. It was sunny and over 30 degrees C. when the team attached cement sheeting to the front verandah walls ready for them to be clad in manufactured stone by a husband and wife bricklaying duo from Albany. They took a couple of weeks to complete the job because every piece had to be fitted into its place, involving careful selection and often some cutting with an angle grinder. The stone had the effect which we hoped for; it breaks up what would otherwise be a large expanse of corrugated steel cladding.
  |
  |
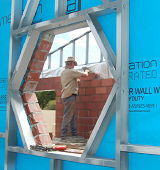
Early in the New Year the windows, sliding doors and bi-fold doors were glazed. This meant we had to be careful not to walk into the glass; quite a risk since we had become used to using various windows and the closed doors to come and go. We already had a solid jarrah front door, made from the floor boards salvaged from the demolished cottage, so we were now close to lock-up stage.
 |
  |
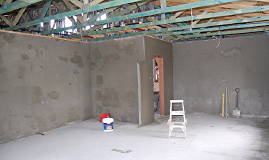
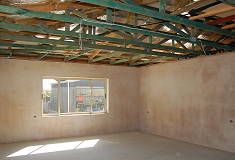
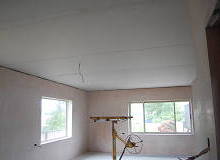
Sometimes nothing happens for days, then suddenly everyone wants to turn up. The plasterer was still finishing the ceiling when the painters contacted us and said that they would like to start immediately - the weather was preventing them from completing any of their outside jobs. So we agreed and in one day they applied two coats to the living room ceiling, and within a week all the ceilings were done, and the walls had two undercoats and one top coat. The final coat had to wait until most of the cabinetry and tiling was completed.
  |
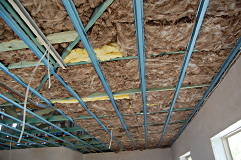
Although this whole process involved a lot of time, it was reasonably straight-forward so we decided to do most of it ourselves. We hired the ceiling plasterer's scaffolding and spent several weeks sticking up the building paper (literally, using double-sided tape) and screwing battens into the steel frame. We ordered the pine and were shocked to discover that we needed 1.2 kilometres of it - it came in 5.1 metre lengths.
 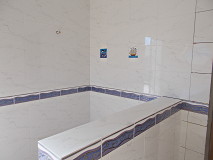 |
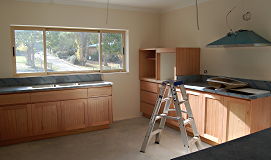
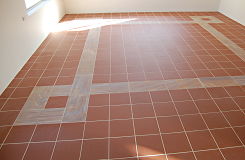
Choosing tiles was a major headache. To be "on trend" you apparently have to have tiles which are some shade of grey, which meant this was all the shops stocked. It has certainly changed in the twenty years since we built on the farm. We were not enthused by any of our choices, but once the tiler had completed the two bathrooms we were happy enough. At least we managed to have the two brightly coloured picture tiles purchased in Crete placed in the en-suite shower recess. Yes, we do buy strange souvenirs. At this stage the cabinetmaker (our farm neighbour) finally installed a lock on the front door which meant that we were officially at lock-up stage - a major milestone!
  |
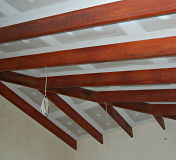
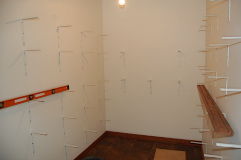
Our skill at measuring, cutting and placing pine lining boards turned out to be limited, but we found that even fairly large discrepencies merged into the overall "rustic" quality of the atrium walls. At the lower levels, silicone filler covered up a few of our more obvious mistakes. Once the wall lining was completed we moved on to the ceiling, maintaining the rustic theme by using Colorbond corrugated steel with simple overlapping joins, despite the objections of our "metal" tradesman who reluctantly agreed to install it with our help. In the end the task was carried out faster than he predicted and maybe not with a result as bad as he thought.
  |
 |
Our cabinetmaker (versatile chap) laid the engineered timber floating floors in the bedrooms and finished them off with jarrah skirting boards salvaged from the flooring of our demolished cottage. The architraves also came from the same source. When the plumber completed a couple of final tasks, we could finally get water out of the taps and light from the lights, including the "chandelier" we bought and carried home from Istanbul.
It was now two years since the concrete slab was poured, and there still seemed to be a lot to do before we could contemplate moving in.
 |
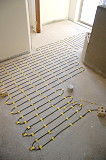
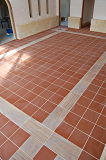
While all this progress was occuring, we were trying to sort out the kitchen / living room / office flooring. This was to be an engineered timber floating floor, with underfloor heating in the living room. Despite endless internet searches and a few emails, we could not come up with a clear idea of what products to use and how to go about it. After a lot of frustration and with no solution in sight, we decided to ditch the timber floor and go with slate-look ceramic tiles. We found a heating mat kit available on-line with cables just 2.2 millimetres thick which are designed to go in the tile cement. As a bonus, we saved several thousand dollars - timber flooring is expensive! Unfortunately the 16 amp cabling assigned to the heating was not enough for the total of 18 amps drawn by the heating elements, so a second cable and thermostat had to be installed - we found a location on an outside wall which allowed the power cable to be taken through the cavity and the office ceiling space to the electricity distribution box.
  |
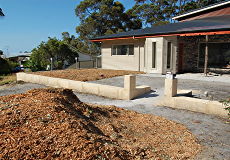
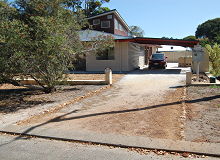
With the wall completed the front of the block was levelled by wheel-barrowing the saved top-soil from the backyard.
The wall really changed the "look" of the house, even before all the earthworks were completed.
 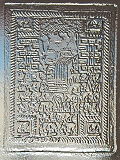  |
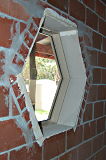
Mark Hewson from Torbay Glass made and installed a splashback and toilet door insert with patterns derived from a printing block that we collected in India, and from a Malawian carving of a line of young girls. The wooden pieces are used to make a shallow mould in powder in the base of a kiln and the glass is slumped (melted) into it.
Early in January the tiler said that he could start soon so we laid the heating mat for the living room. This went fairly well, but we ended up with heating in the computer room as well - to "use up" the excess mat so thet the 'cold tail' ended in the corner where the cables went through the wall to the thermostat (the cable comes as a fixed length which cannot be cut).
  |
Outside, the driveway gained some edging put together from bricks and coffee rock saved from the demolished cottage, and we started organising a clothes line, a TV aerial, and the installation of solar panels and their inverter. If we needed to, we could have moved in at this stage, but we were not in a rush to leave the farm and in fact there were still a lot of things to do.
  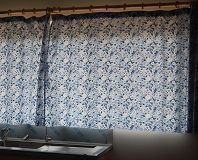 |
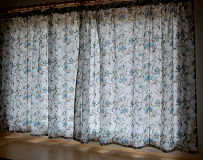
We could not find any curtains we liked locally, so on a trip to Perth before Christmas we bought curtains for the five windows which needed them. All material sold as curtain fabric seemed to be too heavy, boring and expensive, or too plasticy, so we generally went for bright dress fabrics which added a bit of colour to the rooms in addition to controlling the light and providing privacy.
  |
As it turned out, our trip to Perth was just in time - less than a week after we returned the regional areas of the state were isolated due to COVID-19. We continued to work on the house through this period, but almost entirely on our own, with only a couple of tradesmen on site for just a few hours each.
   |
With winter upon us we worked on brackets for shelving inside if it was wet, and paving outside on fine days. To protect the edges of the paving from "collapsing" we first put down a single line of pavers on a base of recycled bricks where the paving abutted garden areas.
With our building license extension and our owner-builder insurance due to run out at the end of the month, in the middle of June we filled in the "construction complete" form, and took it and related paperwork to the shire office. We were surprised when they said they would just add the documentation to the file and that no inspection was required. We also insured the house as a habitable building even though we still had no idea when we might move in.
|
Construction of the combination shadehouse / compost bins / raised garden beds also got under way, using old pavers and the considerable pile of excess bricks from house-building. Through spring the pile of left-over bricks decreased as the shadehouse grew. Once we reached the level of the top of the compost bins we could fill the raised garden bed with soil and even managed to plant it out with vegetable seedlings. We also added a couple of new taps. When the shadehouse brickwork was completed the original large brick pile was reduced to just a few remaining bricks.
There were just enough left-over patterned sandsone tiles to make a base for the outside shower. We decided to do the garden around the shower in Japanese style; and took time out for several day trips to distant specialised plant nurseries to get some of the plants we wanted. We had enough small slabs of granite saved from the old cottage to make stepping stones to the shower, and limesone block offcuts to add a place to hold the soap.
|
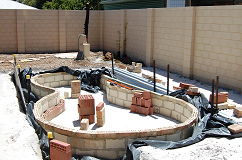
The pond wall was constructed from two lines of left-over bricks creating a cavity which was filled with concrete. Two courses of full-height bricks topped with one half-height, then pavers for capping, provided a total depth of half a metre. The pond was a "bi-lobed" shape so that we could put a small bridge across the middle.
|
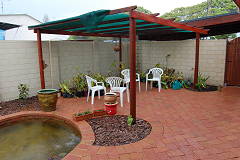
The next project was to construct a pergola, hopefully to be covered eventually in grape vines to provide shade in summer but let the sun in during winter. The pergola consisted of four treated pine poles and connecting beams stained to match the existing verandah timbers. Some of our "demolition" timber from the farm was used for cross-beams. Then we finally installed the jarrah gate at the back of the carport to provide some security and privacy.
Our friends had for some time been making jokes about our house-building "hobby", on the basis that it looked like we would never move in. At the start of April we properly connected the gas and the fresh water supply and actually chose a date for the relocation. We arranged a removalist to transport all the large items of furniture and finally moved in on the 19th of May, over five years from when the retaining wall was constructed and the cottage demolished, and more than three and a half years after the foundations for the new house were poured.
|
Although we were living in the new house it did not mean that there was no more work to do. In the following months we worked on the garden and completed the patio pergola, with grape vines planted at the base of each support post. Until the vines grew up to cover the pergola and provide summer shade, it was given a covering of shadecloth. And four months after moving in the final bit of real house-building was completed - the architraves around the atrium stacker doors were put in place.
Having moved from the farm, we had to spend a lot of time clearing out years of accumulated possessions from the farm house and sheds, in preparation for putting the farm on the market. With much more limited storage at the new house, lots of stuff was given away or went to op shops and the rubbish tip.
|
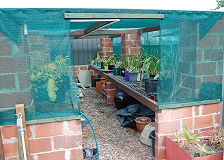
In October the shadehouse finally got its timber rafters and was then covered in 50% shadecloth. After having been moved from the farm to the south side of the new house, where they were severely neglected, the pot plants finally had a proper home where they could receive a bit of TLC.
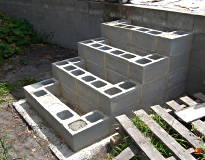
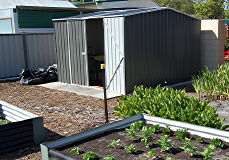
The next major task was to construct a three metre square garden shed, from a kit which we purchased months before we were in a position to assemble it. The foundations, 'H' Besser blocks filled with concrete, could not be completed until the weather was drier. For several months the trenches for the blocks filled with water and partially collapsed every few days with the persistent rain. Finally we managed to place and concrete the blocks, but then Kaye hurt her shoulder so the assembly of the shed was further delayed.
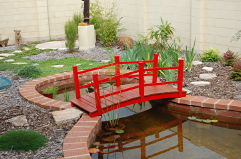
We had always planned to have a small bridge over the pond, but could not work out the best way to construct it. Then we discovered that bridges can be purchased on-line, so we found one for a modest price and it turned up just before Christmas. Despite a few minor glitches in the assembly process, and after significant strengthening with 25 mm. marine ply and painting, we had a bright red bridge which could support the weight of someone walking on it.

|
Despite Kaye's shoulder showing few signs of recovery, the shed was erected in January. The commercial imperitive to minimise materials costs and to fit a three metre square shed into a 1.5 metre long package for transport meant that it is a very flimsy afair, but it is fairly well bolted down to the concrete foundation so hopefully will not blow away. A couple of raised garden beds constructed out of left over colorbond steel can be seen in the foreground of the photo.
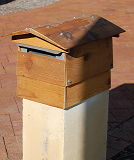
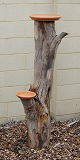
The next project was a new letterbox, built with a 40 mm. galvanised steel angle frame rivetted together and clad with some western red cedar weatherboards left over from constructing the carport on the farm. It, like almost everything else, took a lot longer than expected to complete, mostly due to compound saw repairs taking months to sort out. After some wattle birds used the pond to have a bath, we decided that it might be time to give them and other smaller avians a proper bird bath. We constructed one from a terracotta plant pot saucer perched on a log from a fallen tree from the farm.
|
Just under one year since we planted it, we welcomed the first two flowers on our dwarf magnolia. The rest of the patio garden also grew at a great rate over summer, including the grape vines on the pergola, so that we had to remove the shadecloth to give them the space to spread over the rafters.
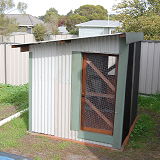
When we demolished the cottage we gave away lots of the materials, but kept some timber and steel roofing. Eventually, we got around to using some of it, firstly for raised garden beds and then to construct a chook house. We did not have immediate plans to get chickens or ducks, but we wanted to use what we needed so that we could get rid of whatever was left over to contribute to cleaning up the back yard.
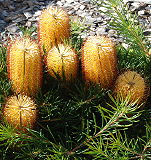
We slowly added new plants to the gardens, and the existing plants showed encouraging growth. Some even managed flowers, including the kangaroo paws and our beautiful Birthday Candles banksias in the front yard.

|
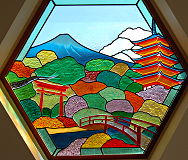
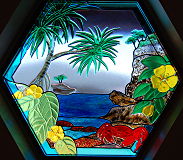
We always planned on having stained glass in several windows in the house, to be made for us by Mark Hewson at Torbay Glass. It took a long while, but the hexagonal windows in the bedroom and en-suite, and the three very tall narrow windows in the entry finally received their colourful panels. In fact they are pieces of fused glass connected with copper foil rather than the traditional lead "came"; this is the technique used by Tiffany with their lamps and other objects made around 1900. The stained glass panels were fitted inside the clear glass already in the windows, and held in place by timber beads made by our cabinetmaker. This meant that these windows were effectively double-glazed.
Our bedroom window has a Christmas Island theme, including one of the famous red crabs, and the one in the en-suite bathroom has a Japanese theme with a pagoda and a torii gate. The three entry windows have Australian landscape designs: desert, forest and ocean.
Eighteen months after moving in:
After living in our house for over a year, it is probably time for us to consider that the construction process is completed and to look forward to other activities besides house building. The problem is that it never seems to be quite over; there is always another project to work on. Anyway, this page should not just wander off into the indefinite future, so this seems a good time to bring it to an end.
If you are interested in designing and/or building your own dream home, you might find our
summary page
useful - it covers some of the pitfalls we encountered and some of the things we learned along the way.